checklist

(Checklist) Basic embossing

This is part of a series of checklists I am making available to you.

Click the "Printer-friendly version" link at the bottom of the page and feel free to print out as many copies as you like!
----------

Basic embossing checklist
(Half slot embossing)
version 2016/12/13

Items needed
___ Tools to disassemble the harmonica (screwdriver)
___ A hard round object (Example, a chrome-plated socket) or a specialized Embossing tool
___ Plinking tool
___ Reed work or gapping tool
___ Reed wrench
Prep work
___ The harp is airtight
___ The reed shapes are favorable
___ Gaps are set
___ The harmonica plays well (Embossing will never, ever fix a problem)
Embossing
___ Take the harmonica apart
___ Lay reed plates reed-side-up on a flat surface
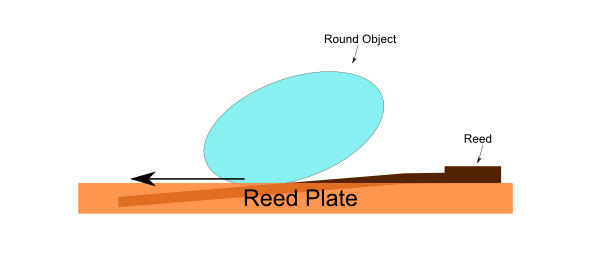
___ Press the Embossing tool or round object into the middle of a slot. Advance to the tip (not the base) using gentle downward force
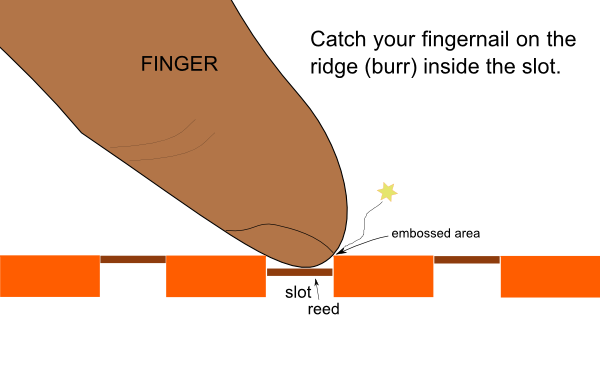
___ Use your fingernail to feel for a catch on the inside of the slot. If none is present, repeat the previous step with slightly more downward force.
___ Plink the reed to make sure you didn't use too much force and over-do it.
___ Repeat the process for the other slots

Troubleshooting
___ If the reed won't plink, consider reed alignment.
___ If you embossed too much, apply pressure to "un-do" the embossed ridge using the reed tool or the plinker. Look through the slot and press the tip of the reed through. Can you see where the reed is contacting the slot? Apply gentle pressure to the slot wall in that area.

(Checklist) Reed replacement

This is part of a series of checklists I am making available to you.

Click the "Printer-friendly version" link at the bottom of the page and feel free to print out as many copies as you like!
----------

Reed replacement checklist
version 2016/07/24

Items needed
___ Hammer
___ Reed removal pin
___ Reed removal spine
___ Brick or anvil
___ M1.4 tap
___ M1.4 screws
___ Reed wrench
___ Flush cut pliers
___ Drill press or Rotary tool with reamer bit

Remove bad reed
___ Identify bad reed
___ Place correct rivet head into reed removal spine hole (reed tip points away from spine)
___ Punch out rivet
___ Flip reed plate around and place on flat part of reed removal spine
___ Flatten hole using flattening pin
___ Tap hole using M1.4 tap. De-burr as needed

Prepare new reed
___ Obtain new reed
___ Enlarge rivet hole using drill press (1/16th inch bit) or rotary tool with reamer
___ De-burr as needed
___ Flatten rivet pad using flattening tool and flat part of reed removal spine

Install new reed
___ Position new reed into slot standing up and pinch it with your fingers
___ Insert M1.4 screw and tighten all the way
___ Loosen the screw very slightly
___ Look at a light source through the slot and align the reed
___ If the reed doesn't align, remove the screw, enlarge the hole in the rivet pad and repeat all the steps to prepare the reed
___ Pinch the base of the reed very tightly to hold the reed in place and tighten the screw
___ Re-confirm reed position and alignment
___ Snip off back of screw
___ Re-confirm tightening of screw
___ Re-align reed
___ Flat sand draw reed plate or sand down tip of screw in blow plate

Fix reed shape and tuning
___ Correct reed curve using pressure and counterpressure
___ Tune reed

(Checklist) Convert Marine Band 1896 to screws

This is part of a series of checklists I am making available to you.

----------

Convert Marine Band 1896 to screws checklist
version 2016-12-13

Items needed
___ Thin Paring knife
___ Drill press with 1/16 inch and 3/32 inch bits
___ Pliers (flush cut or needle nose)
___ M2 Tap and tap holder
___ M2 Screws and nuts
___ Clean sheet of 220 grit sandpaper taped to a flat surface
___ F tool
___ French Tuner
___ Wet towel to moisten fingers
___ Replacement comb
___ Flat punch (optional)

Remove cover plates
___ Pry off covers using a paring knife
___ Gently remove nails from covers using pliers
___ Drill front cover plate holes with 3/32 in bit
___ Flatten back nail holes for aesthetic purposes (optional)

Remove reed plates
___ Insert paring knife between back of blow reed plate and comb
___ Advance the knife without prying up so as to lift up all three middle nails (only the three middle nails)
___ Remove nails using pliers
___ Insert knife between back of draw plate and comb
___ Advance the knife without prying up so as to lift up all three nails (only the three middle nails)
___ Remove nails using pliers
___ Place harmonica top(blow plate)-side-down onto drill-press surface
___ Drill through-and-through the three draw plate nail holes using a 1/16 inch bit
___ Remove the remaining nails on the sides of the reed plate using the paring knife and pliers

Prepare reed plates
___ Tap three 1/16 inch holes in DRAW plate with M2 tap
___ Flatsand the draw reed plate using 220 grit sandpaper and a flat surface
___ Enlarge the holes in the BLOW plate using 3/32 inch drill bit
___ De-burr the holes of the BLOW plate
___ Check and correct flatness of the BLOW plate using the French Tuner and the F tool.

Assemble the harmonica using screws
___ Gather both reed plates, both cover plates, five M2 10mm screws, two M2 nuts and a flat comb
___ Hold the comb with the long slots to your left
___ Pick up the reed plate that has all the rivet pads lined up at the front. This is the blow plate
___ Put the blow plate on the comb with the reeds on the inside
___ Put the draw plate on the comb with the reeds on the outside
___ Line up the plates and the comb so that you can insert the middle screw
___ Tighten the screw almost all the way. Keep it loose enough so that you can wiggle the plates and comb to align the other screws
___ Insert the two other reed plate screws
___ Align the reed plates and comb to your liking (press the tine-side down onto a clean flat surface to line everything up)
___ Tighten the screws using finger pressure

Install the cover plates
___ Place the top cover plate (with the numbers) into the groove on the top of the blow plate
___ Turn the harmonica over and place the bottom plate into the groove on the draw plate.
___ Line up the cover plate holes and insert a screw
___ Wet the tip of your finger and pick up an M2 nut
___ Place the nut onto the tip of the screw and tighten almost all the way
___ Align the cover plate holes on the other side and insert a screw and nut
___ Tighten both screws using finger pressure.

Checklists

I use checklists. They help me do my work better and faster.

"A checklist is a type of informational job aid used to reduce failure by compensating for potential limits of human memory and attention. It helps to ensure consistency and completeness in carrying out a task." (Wikipedia)

I don't have a checklist for every task I do, I tend to make them up when I realize I keep repeating the same mistake. I also tend to revise some checklists quite often, incorporating new and better ways of doing things - just because I use a checklist doesn't mean I stop thinking. In fact, a checklist helps me come up with new ideas and incorporate them in my practice very easily.

There are two general types of checklists. The first is just a list. For example, you make a list of things you need to pack before going on a trip. Before you leave, you go through the list to make sure you haven't forgotten anything. This is generally called "Do - Confirm"

The second type is generally called "Read - Do" and it breaks down the steps of a task. It's meant to be read in sequence and each step of the task is performed before you move on to the next step.

I will be publishing some checklists in the coming weeks right here on my website. I hope you find them useful!

I won't publish every checklist I use. But I may make up some new ones to help those who prefer having a written guide when they try out a new task for the first time.

Subscribe to RSS - checklist