Reed Replacement Screws and Washers (100 pieces)
These are Stainless Steel M1.4 screws and washers used for replacing reeds. They are non-magnetic because they are made of 304 Stainless Steel and will never corrode.
These are Stainless Steel M1.4 screws and washers used for replacing reeds. They are non-magnetic because they are made of 304 Stainless Steel and will never corrode.
***Please note I am no longer offering this tool. I have a new tool set which takes its place. Please see The Flatness Tool™ and Reed Plate Claws™***
It's no secret that a comb flattened by hand will outperform one that is machine-made.
Use this tool to make your combs flat.
There are only two or three ways to change the shape or curvature of a reed. There are several ways to perform each of them and of course you can combine them in a million ways.
Here's a reference to doing reed work. It's a PDF file you can download for free! Click the image to download...
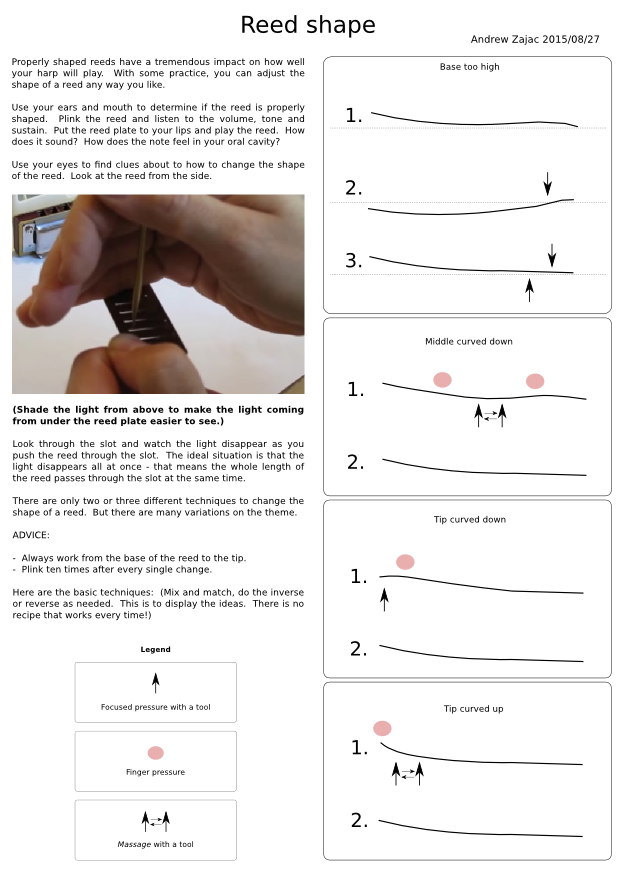
REAL-LIFE DEMONSTRATION:
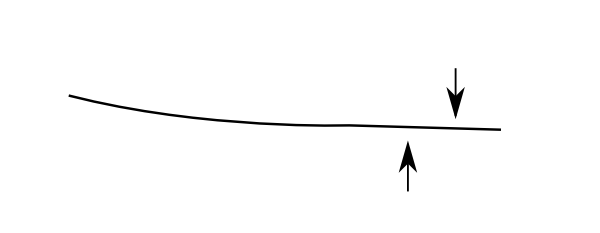
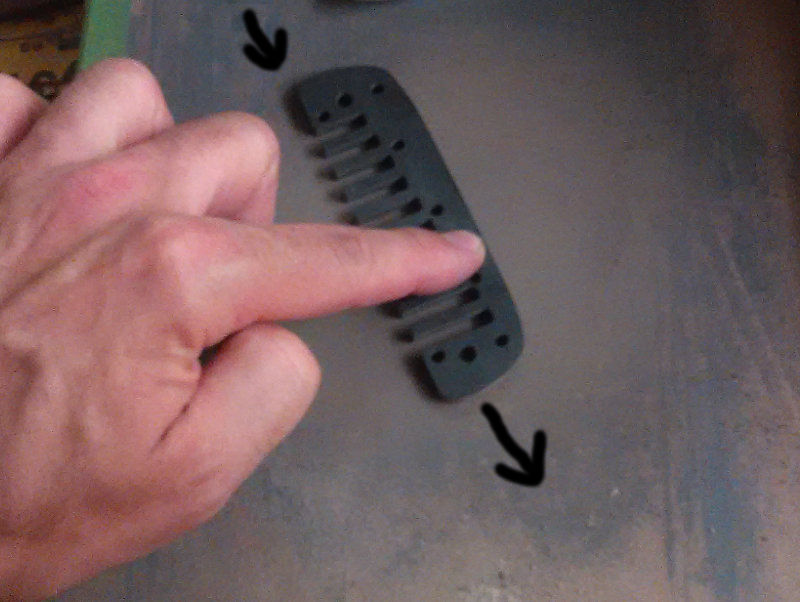
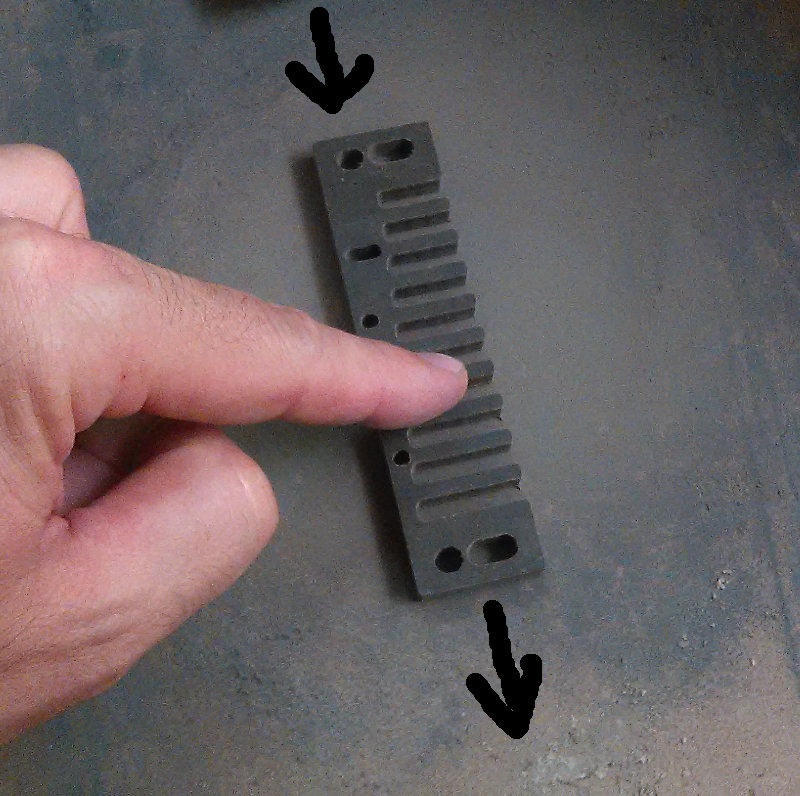
(The black arrows indicate pressure applied with a tool and the pink round spots indicate counter-pressure applied with your finger.)
Curve the tip down:
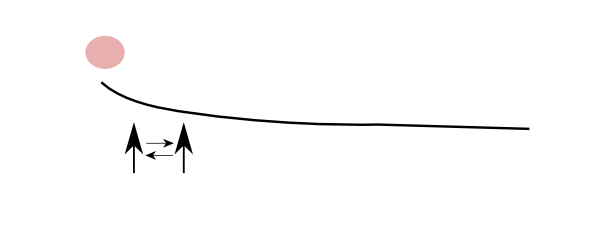
Curve the tip up:
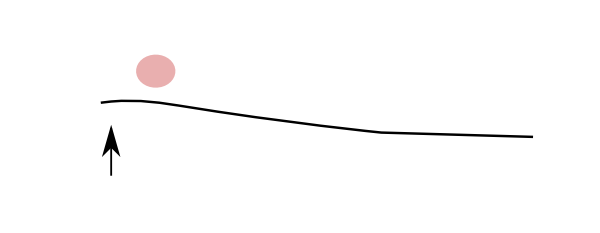
Lower base of reed:
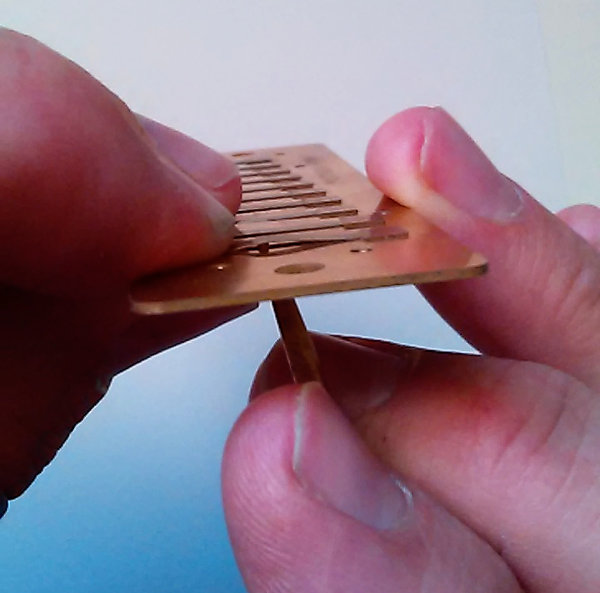
This is a description of how I get the proper view of the shape of the reeds:
"You don't need to throw away a harmonica because of a blown reed."
Part 1
See Part 2: How to replace a reed on a diatonic harmonica.
Reeds fracture with use. You don't need to throw away the harmonica because of a blown reed. Just like broken guitar strings can be replaced, so can harmonica reeds. In fact, you can change a harmonica reed in the same amount of time it takes to change a guitar string (maybe less!)
Reeds don't usually break off, they just drop out of tune because of microscopic fractures. If you play hard you will blow out reeds faster. Plink a fractured reed over and over and you will hear the pitch drop until the reed just stops moving - and eventually falls off - because the fracture grows to the point where it's not microscopic anymore.
Harmonica reed replacement is simple but it's not always easy. Replacing harmonica reeds is a bit of a paradox.

The chicken or the egg? Where do you start?
The first thing you need to do to a reed that has been freshly replaced is adjust its curvature so that it plays well. This is much more involved than just gapping. Re-shaping reeds takes some time and practice to learn. As part of the learning process, you will probably damage some reeds and they will have to be replaced.
That's why replacing reeds is an advanced skill.
To guarantee the new reed sounds right, there are a few things to consider:
1- Fastening a reed onto a reed plate can do some funny things to its shape. You need to be able to check and correct the shape of a reed to have success 100 per cent of the time. See this reed work reference.
2- Taking a reed off and putting one back on may also bend the reed plate if you are not careful. It's important to try not to bend the plate as you work. You must check for flatness once you are done and straighten a crooked reed plate.
3- Don't forget about tuning. The new reed will probably be out of tune - sometimes factory-new reed are out by as much as 50 cents! You will need to tune it.
Most harmonicas use rivets to secure the reeds to the plate because it's very cost-effective to mass-produce them that way. But there are other - better - ways of fastening a reed to the plate. There is nothing special about using a rivet.
A reed that's attached to the plate with a screw will not sound any different than a reed attached with a rivet. What's important is that the reed is secure, straight and centered and has a proper shape/curve.
Using a screw will allow you to get the reed perfectly positioned and won't warp the reed plate. You can guarantee success 100 per cent of the time.
Suzuki reeds are welded onto the plate. They don't use rivets. You don't need to buy a welding torch. The reeds can be removed easily by twisting the rivet pad just like rotating a reed with a reed wrench. To fasten the new reed, you drill a hole into the new reed and into the plate and secure the replacement reed with a screw.
Where do you start? Just jump on in!
See Part 2: How to replace a reed on a diatonic harmonica for the procedure.
Part 2
Part 1: Replace reeds on a harmonica just like you change strings on a guitar.
The procedure at a glance:
- Find a new reed.
- Remove the BAD reed and flatten the reed plate.
- Tap the plate to receive an M1.4 screw and flatten the plate.
- Put the reed in the slot and insert the screw all the way without tightening it.
- Use a reed wrench to position the rivet pad so that the reed is straight and centered. Tighten the screw.
- Snip off the other end of the screw with flush cut pliers and debur.
- Check the flatness of the plate.
- Adjust the reed shape and tuning.
___________________________________________
I offer a kit with all the specialty items you need to replace reeds on all brands of harmonicas.
___________________________________________
Here's how you replace reeds:
Find a new reed. You can use a new reed from the factory (contact Hohner or Seydel) or scavenge a reed from a donor plate.
Reed scavenging tip: The 4 Draw on a D harp is the same reed as 4 Blow on an E harp. Also, on Marine Band harmonicas the same reed is a 6 Draw on a G or the 6 Blow on an A.
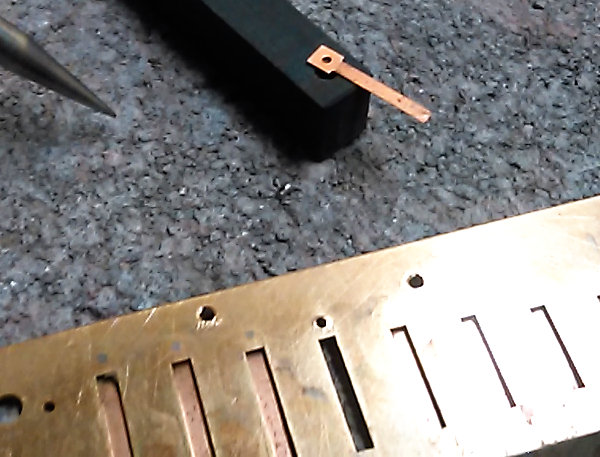
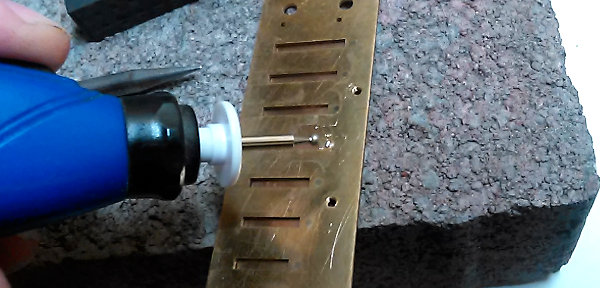
The new or scavenged reed's rivet pad has a hole in it but it's too small to clear the screw we will use.
You can enlarge the hole using a rotary tool with a diamond tip reamer. This method works on Brass and Stainless reeds. See the video below.
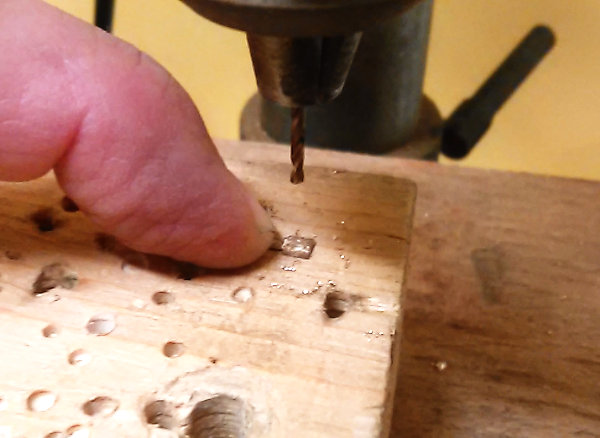
Alternatively, you can drill a 1/16" hole in the reed's rivet pad using a drill press. If you are working on a brass reed, you can do it by hand using a good quality drill bit and a pin vice. Hold the reed onto a wood block to drill.
Please note that Suzuki reeds do not have a rivet and you will need to make your own hole using a drill press. I do not recommend using a hand drill of a rotary tool for this.
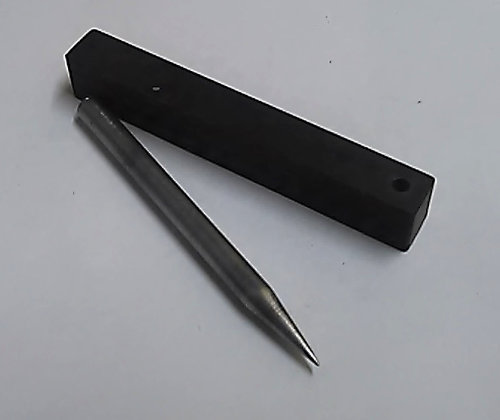
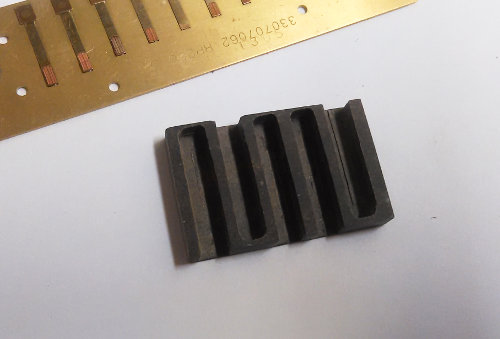
This is the reed replacement spine and removal pin. The spine is the foundation we will use to remove rivets and to flatten both the reed plate and the rivet pad. The removal pin is made of hardened and tempered steel.
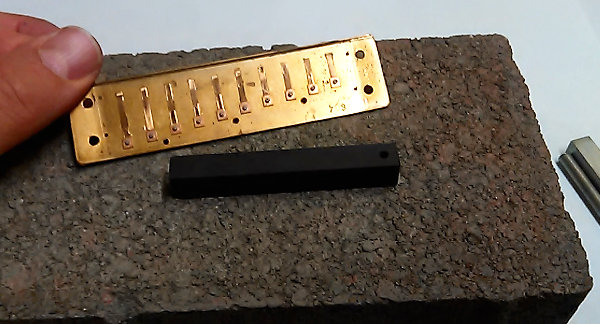
Place the reed removal spine on the brick or anvil. You CANNOT place it straight on a table or counter - the table surface will absorb too much kinetic energy.
A brick or anvil will make sure all the force is directed to the reed removal spine. This is the best way to avoid bending the reed plate and wrecking your harmonica.
Question: "What kind of brick should I use?"
Answer: A heavy one.
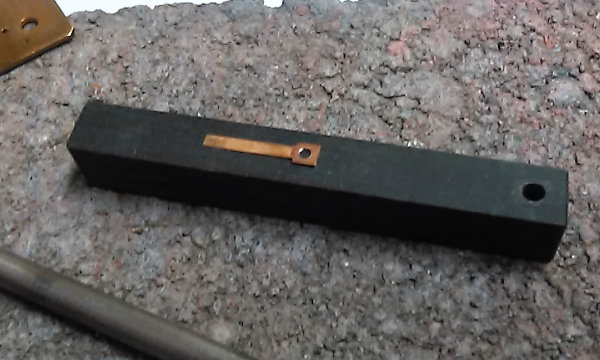
Place the reed on the flat part of the reed removal spine.
Position the flattening pin on top of the rivet pad and strike it with a hammer.
The new reed is ready to be installed.
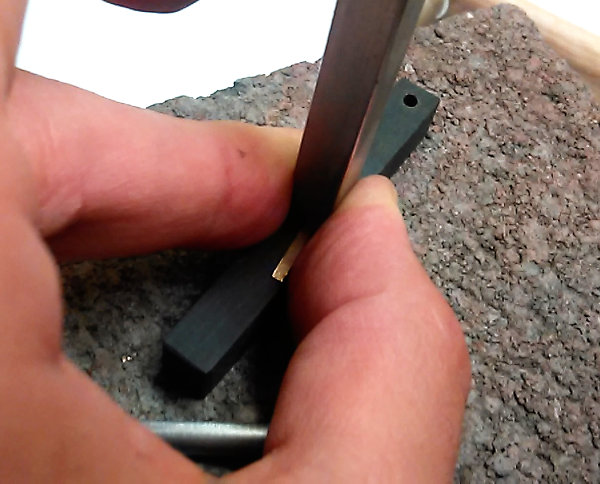
Remove the BAD reed. Position the rivet head upside down in the hole in the spine.

Hold the pin over the rivet tip and strike the pin straight down.
It's best to strike two or three times with light force so that you don't have to drive the pin any deeper than necessary.
The rivet should fall through the hole. Discard the old reed and rivet.
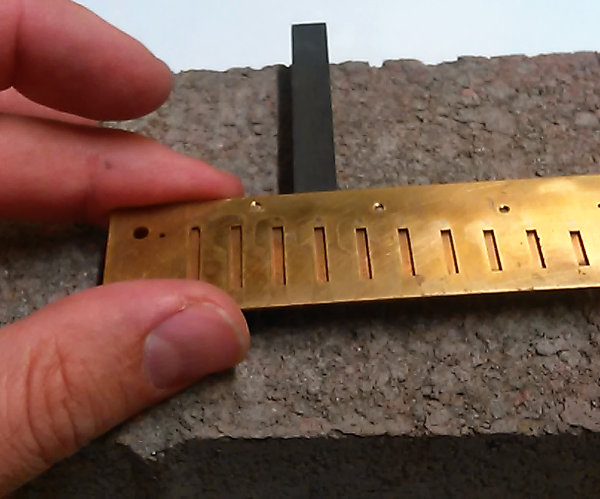
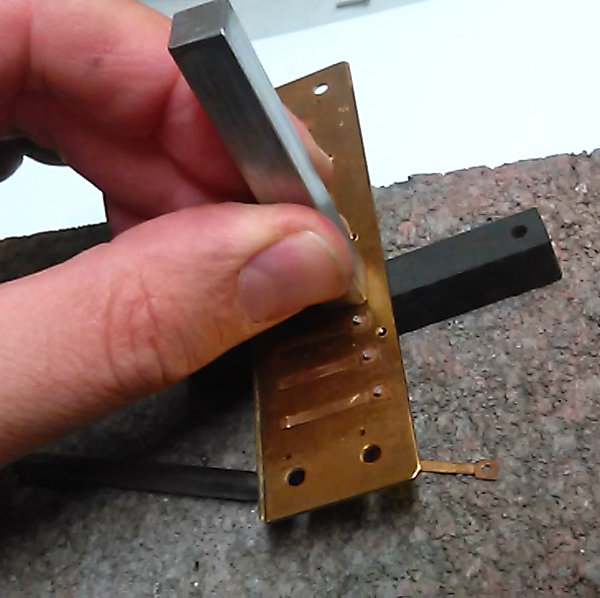
Flip the plate around and place the rivet hole over the solid part of the spine.
Place the flattening pin on top of the plate and strike it with the hammer to flatten.
The hole is now flat. This is essential for the reed to go in straight and be well positioned.
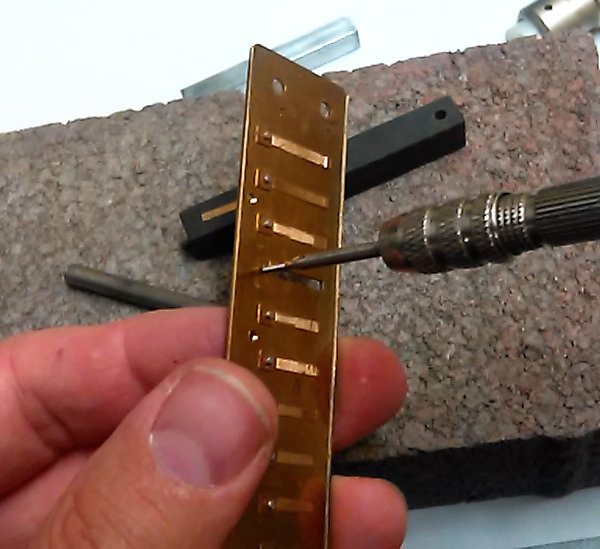
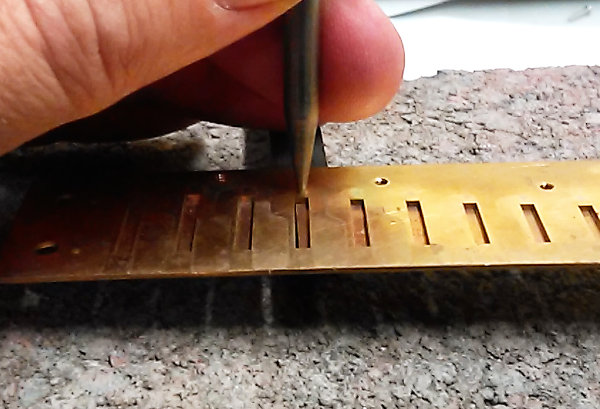
Dip the M1.4 tap in mineral oil and tap the rivet hole. The tap cuts the screw thread into the hole. I don't use self-tapping screws. Self-tapping screws aren't sharp and require more force - we don't want to bend or warp the reed plate. Tapping the hole is an extra step but it's the safest and most precise way to guarantee success.
Flatten the reed plate against the spine once again with the flattening pin.
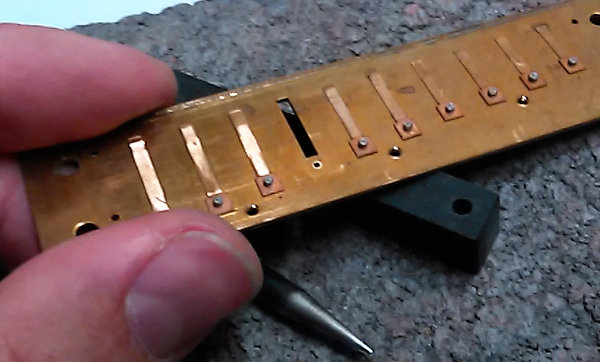
Place your finger behind the empty slot.

Lay the GOOD reed in the slot. Let the tip of the reed touch your finger and the inside of the slot. Tucked away like that, it won't move around as you insert the screw.
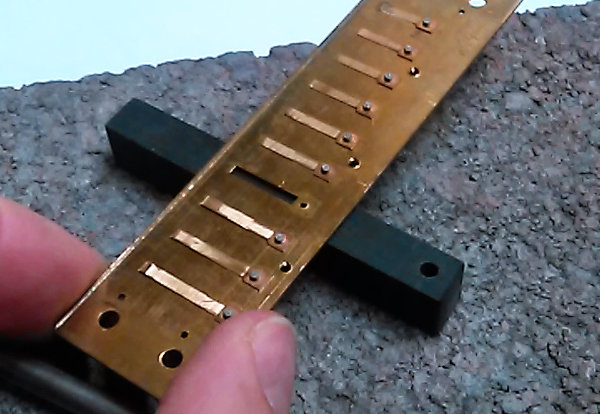
Pinch the reed and the slot and put the screw in.
Turn the screw until it's all the way in but not tight.
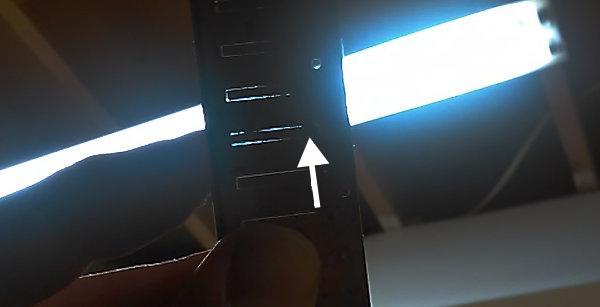
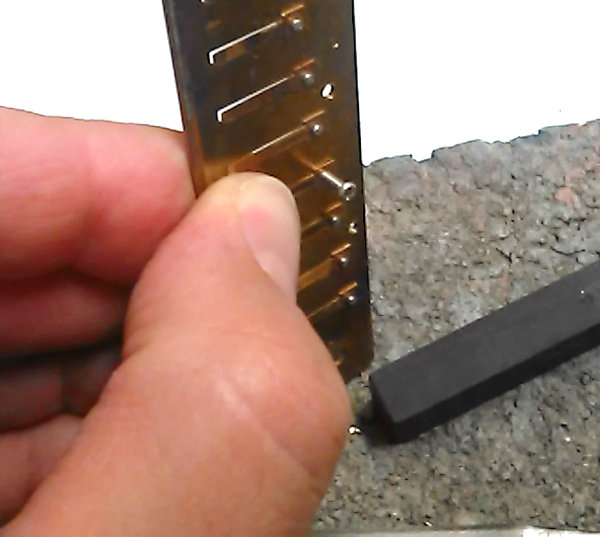
With the reed held in place loosely, hold the reed plate up to the light and look through the slot. Use a reed wrench to move the reed up, down, left or right as needed. Don't worry about rotation, just center the middle of the reed pad. Pinch it in place and tighten the screw.
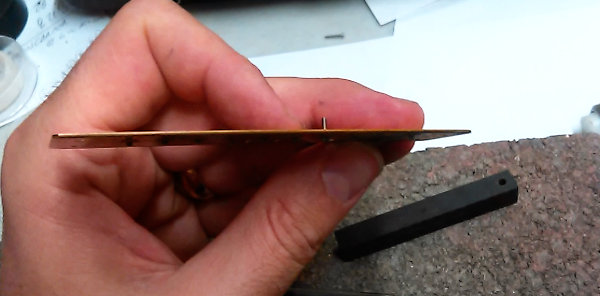
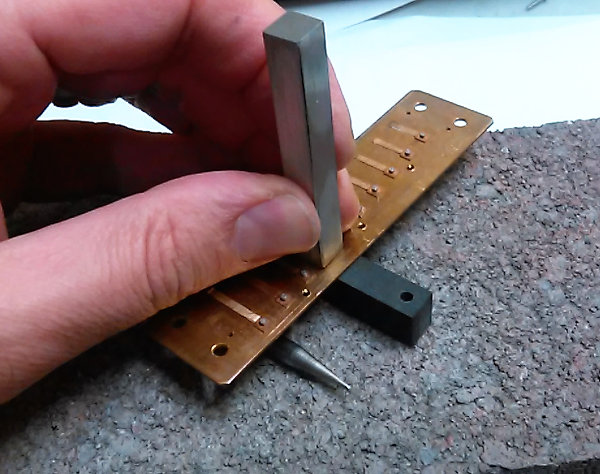
I use long screws because they are much easier to handle. The long end of the screw needs to be cut.
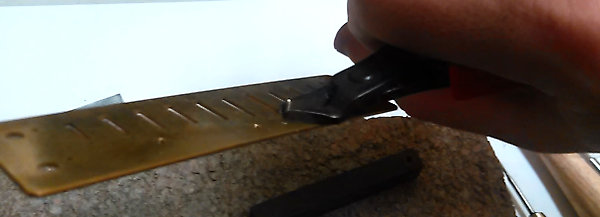
Use flush cut pliers to cut the end of the screw off.
Debur the end of the screw using sandpaper or an engraver.
Tighten again and center the reed one last time. The reed should feel snug.
Use The F-Tool to straighten the reed plate as needed. Flatsand the draw plate to take care of the tip of the screw.
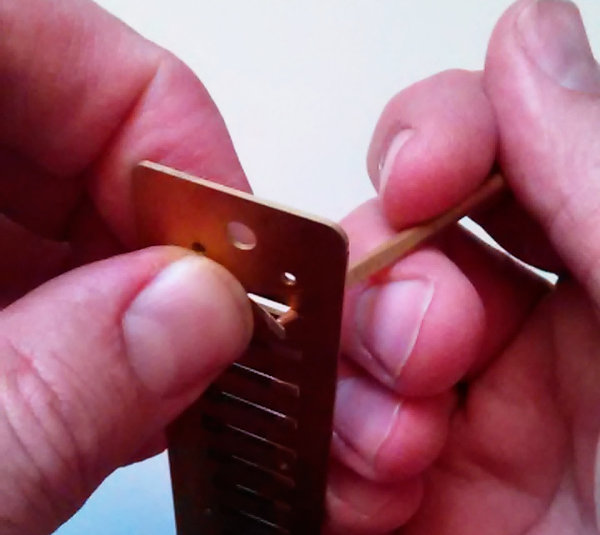
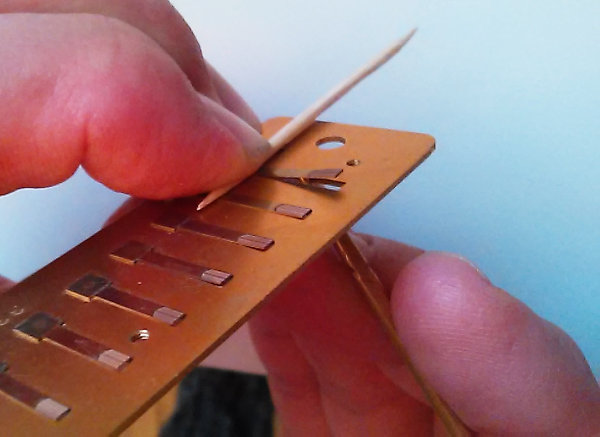
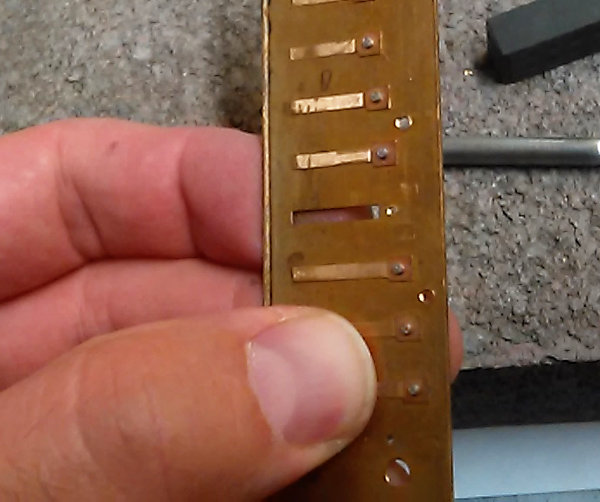
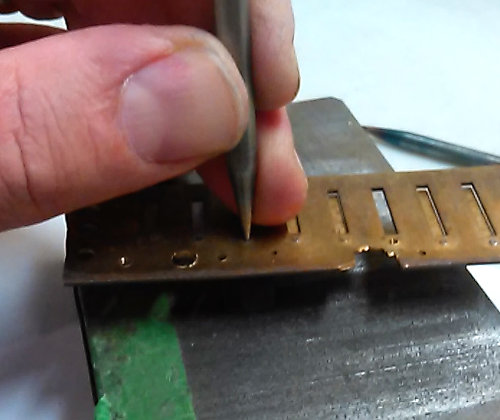
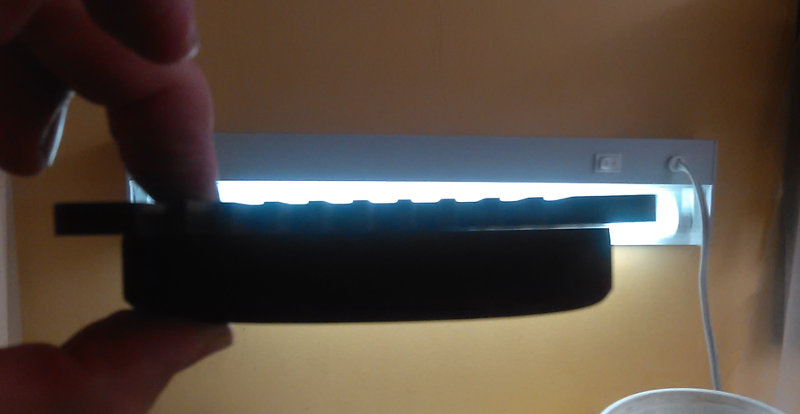
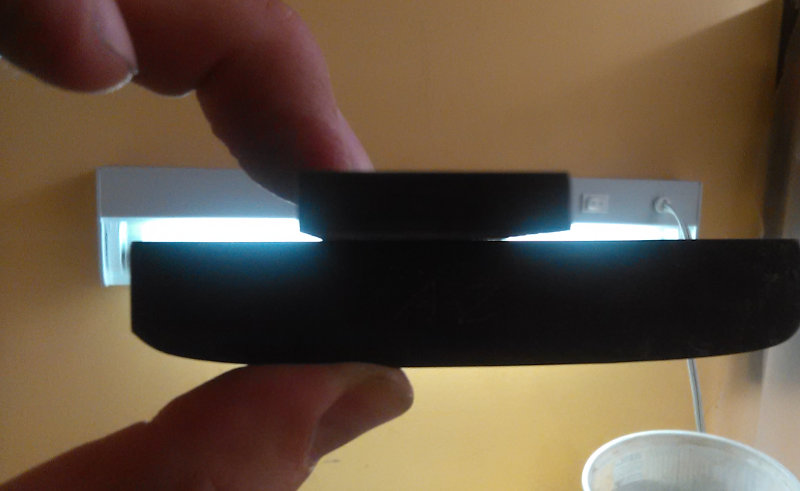
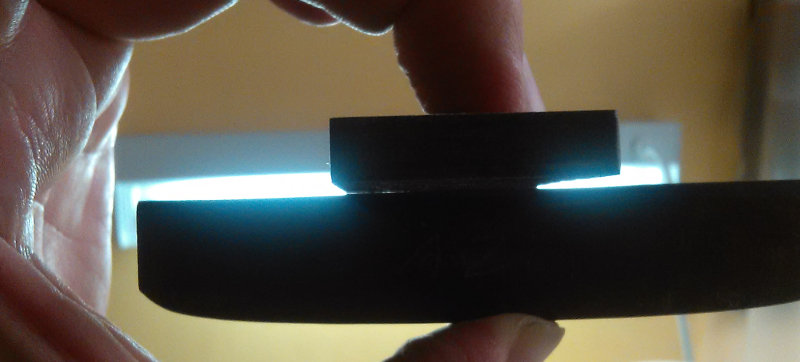
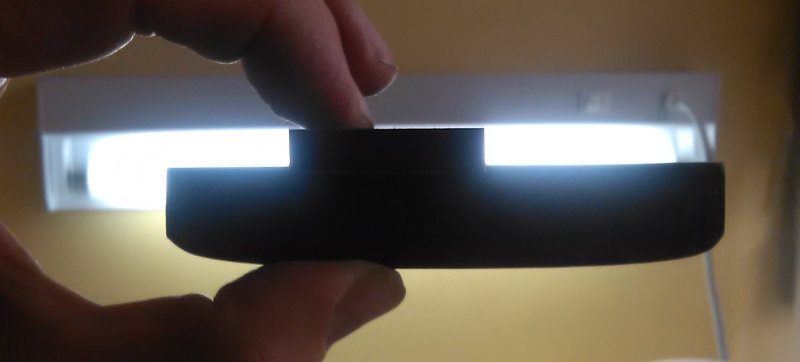
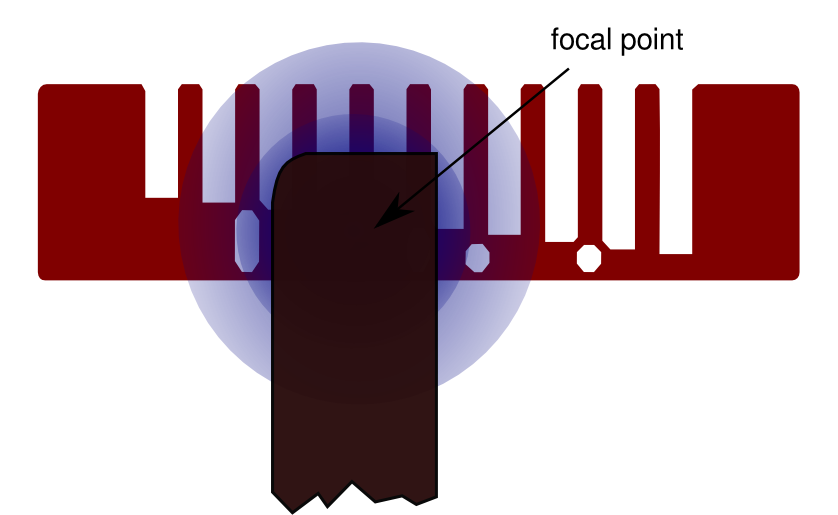
Check and adjust the reed shape. Try to make the reed straight when passing through the slot.
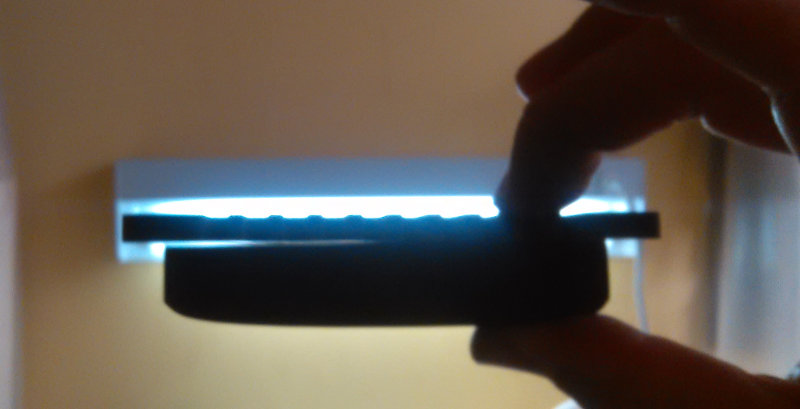
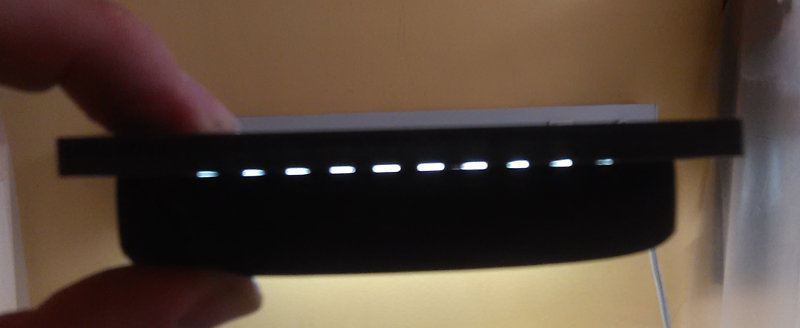
Look at the shape of the reed from the side. Focus your attention on the light you see through the slot as you push the reed down through the slot.

Change the shape of a reed by focusing pressure with a tool onto a specific spot. Use a finger to provide counter pressure from the other side of the reed. Plink the reed about ten times after every change you make to its shape.
When in doubt remember that if the tip of the reed is curved down and enters the slot before the rest of the reed, you will not (never, ever) get a good result.
See this reed work reference.
Tune the reed using this method: Tuning page
_______________________________________
Got into trouble?
Problem: There is no way I can align the reed!
Solution: Enlarge the clearance hole in the rivet pad. Use a 5/64" bit or even a 3/32" bit. Flatten the pad.
Problem: I stripped the thread!
Solution: Use a larger screw. Tap the hole with a larger tap. Use M1.6. You can also step it up to M2. On the blow plate, you can use a screw and a nut, too.
_______________________________________
Updated Reed Replacement kit (2015/12/20):
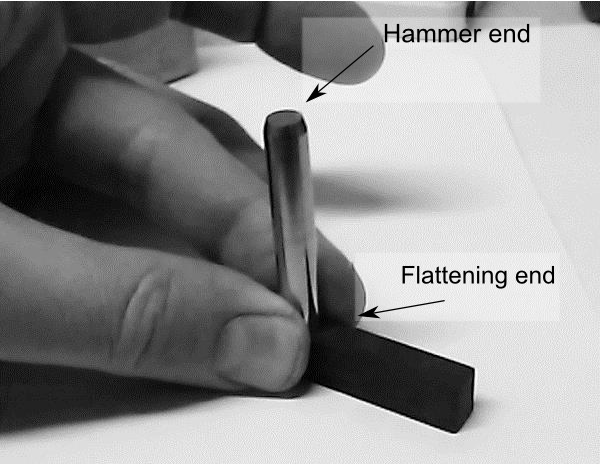
New Flattening Pin Design: The square flattening pin shown in the instructions has been replaced with a round pin with two different ends.
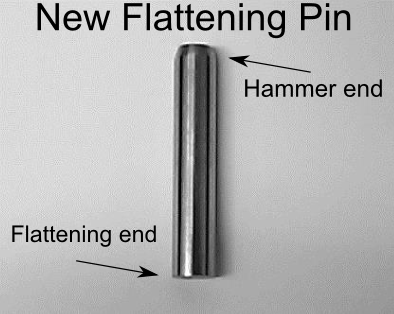
One end is to be used to flatten reeds and reed plates and the other is struck with the hammer. The flattening end has been hardened and tempered.
"You don't need to throw away a harmonica because of a blown reed."
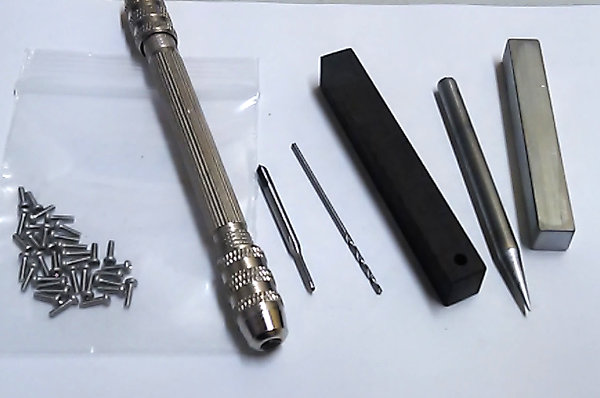
Includes:
- Stainless steel reed replacement screws (75 pieces screws and washers)
- M1.4 tap and pin vise
- 3/64" drill bit
- Reed removal spine and Rivet Bar
- Hardened and tempered O1 steel reed removal pin
- Flattening pin
I visited Alchemy Studios in Bath, Ontario to meet Mitchell Elliott. He was kind enough to show me how to harden and temper steel to make some tools.
Until now, I have been limited in the kinds of tools I can offer. I haven't been offering a reed replacement solution because I haven't been able to make a proper pin for reed removal. What I have been able to come up with until now has been too small and quite brittle. Now that's changed.
These pins are hardened, tempered and one is also polished.
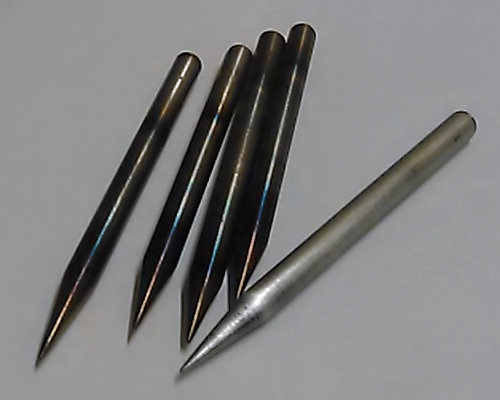
This is for reed removal:
The pin is easy to align. Its tip is small to drive out the rivet without warping the reed plate. It's hard enough to last a lifetime. It's tempered so it won't shatter.
I'll be putting together a complete reed replacement kit which will include an M1.4 tap, pin vise and Stainless Steel M1.4 screws. The kit will be available soon. Stay tuned!
Looking for fast results? Want easier bends/overblows/overbends and better tone? Most player's needs can easily be met just by following the fundamental steps.
 See also Five things you can do to make a harmonica play better.
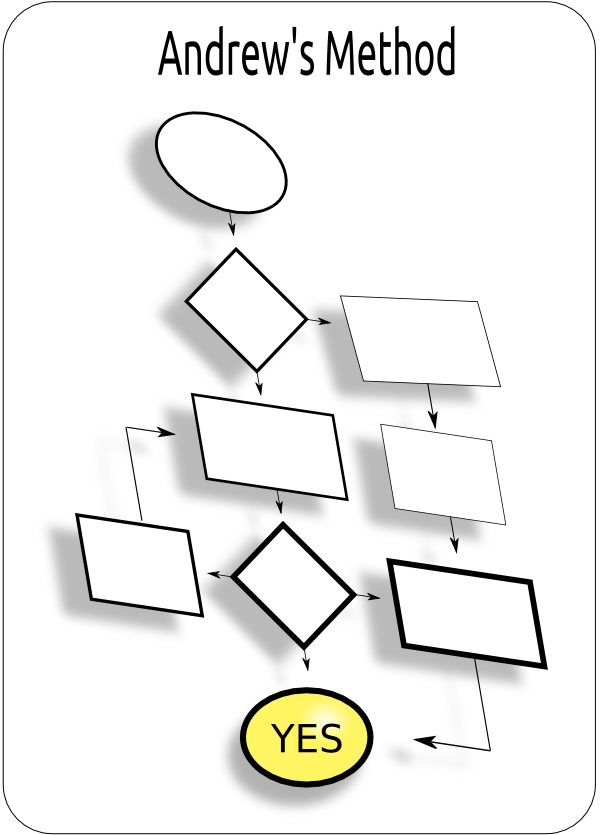
Here's a quick reference to the process of upgrading a harmonica.
My method is broken down into two parts: Fundamental and Advanced.
____________________
Start here: Fundamental:
____________________
These are the things that are the most important to get right. I recommend you start with this. You cannot expect more advanced techniques to reach their full potential - or even have the desired effect - unless the foundation is solid.
Most player's needs can easily be met just by following the fundamental steps.
1- Making the harp airtight by straightening the reed plates (The Flatness tools) and flattening your comb. I can save you the work of flattening your comb by offering you my Dark combs™.
2- Precise tuning will augment your harps. They will sound better and stronger. I offer tuning tools to make the process a lot easier.
3- Consistent gapping. This is setting the resting position of each reed so that the reed responds equally to low and high breath force.
Gapping is only one part of what can improve the Dynamic Range Gapping is the last step you do, even if you do advanced work.
____________________
Advanced:
____________________
These techniques enhance the performance, volume and tone of each reed. These techniques are much more invasive than the fundamental techniques. Learning to do these techniques carries a greater risk of damaging your harp.
1- Reed work. The shape (curvature) of each reed can be greatly improved over the shape from the factory. The workers who assemble the harmonica don't usually have a lot of time to adjust the shape of the reeds. All you can expect from the factory is "good enough".
I offer a free PDF reed work reference guide.
I offer a solid brass reed shaping tool and a reed support tool/Plinker to make this easier.
2- Embossing. This brings the edges of the slot closer to the reed to bring out more volume, power and response from the reed. I offer a tool for this and instructions are available to download for free from that page.
____________________
Reed Replacement:
____________________
Reeds fail. Save money and learn to replace reeds on a harmonica just like you change strings on a guitar.
You can't become skilled at fixing harmonicas if you don't know how to change reeds. Likewise, you can't become skilled at changing reeds unless you know what it takes to make a reed play well. I can help you through the learning process. I offer a reed replacement kit and will give you all the support you need to reach success.
I learned how to make combs from friends with over 100 cumulative years of machinist experience! This is my low-tech, high-precision method of making exquisite harmonica combs. You can use this method to flatten the stock comb on your harmonica to make it play better.
The diatonic harmonica is made of solid pieces that must fit together in a way that is airtight. Mass-produced harmonicas often are not airtight and can be improved with a few minutes work.
This process is usually a little faster but the using a camera slows things down a bit.
Use this process on Hohner Bamboo Laminate (Crossover and Thunderbird) combs or the stock Suzuki Manji comb. You can also flatten a comb made of Corian or any other solid-surface material using this method. Be careful not to drop Corian combs - they shatter.
Wooden combs will swell. To flatten wooden combs like the Seydel 1847 or Marine Band Deluxe/1896 combs, I recommend you seal the surface after you flatten. Check for flatness after you seal, too.
Do not use this method on recessed-type harmonicas like the Special 20, Session or HarpMaster harmonicas. Those harmonicas use a different design concept. Checking and adjusting flatness on those combs requires a different strategy. Straightening and flattening the reed plates will make the best of the thin plastic combs in those models and will offer you great results. For perfectly flat reed plates, use The F Tool™.
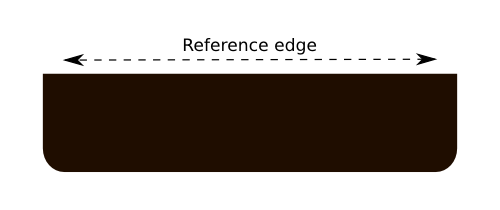
This is the comb tool™. I meticulously flatten the top edge. *Only* the top edge is flat - we will be using that edge as a reference.
My comb tool is a working copy of a high-precision straight-edge (some call this a machinist square) precise to .000025" per 6" (25 millionths of an inch). The original stays in a drawer! If I were to use it on every comb I make, it would eventually wear out.
You can get a set of my comb tools here: Comb Tool™.
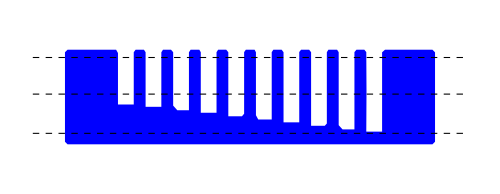
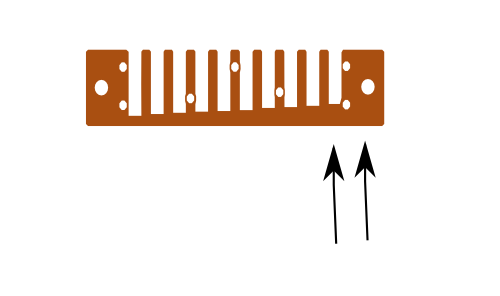
We will be measuring flatness along the left-to-right axis.
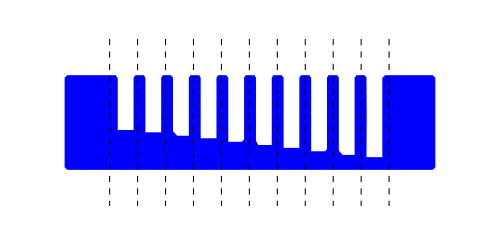
We will be measuring flatness along the up-and-down axis. That means in between every tine.
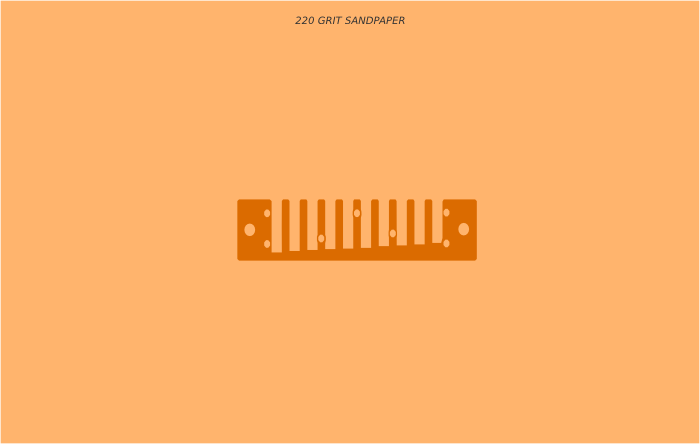
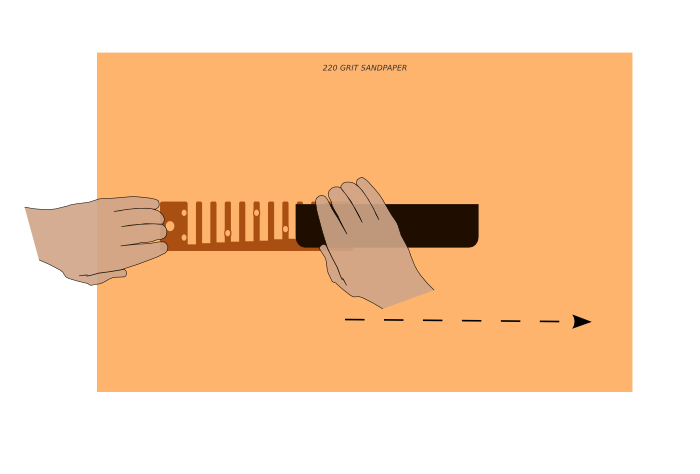
We will be sanding the comb surface. Tape a piece of 220 grit sandpaper to a flat surface. I use a granite surface plate but any flat surface will do. Don't obsess about the flatness of your working surface. The only thing you need to make your comb perfectly flat is a flat reference.
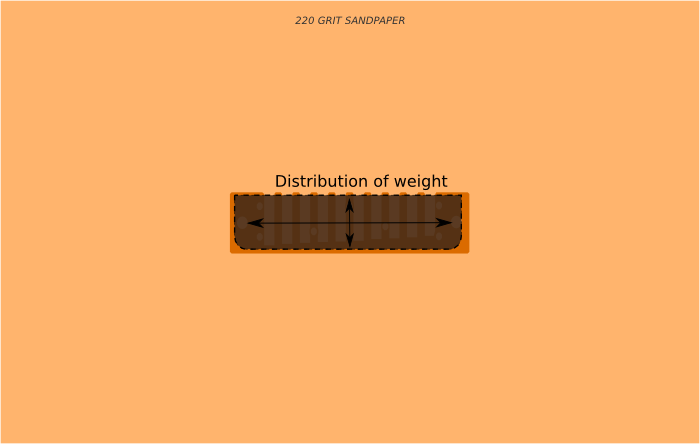
Place the comb tool over the comb to distribute the weight of your fingers evenly over the surface of the comb.
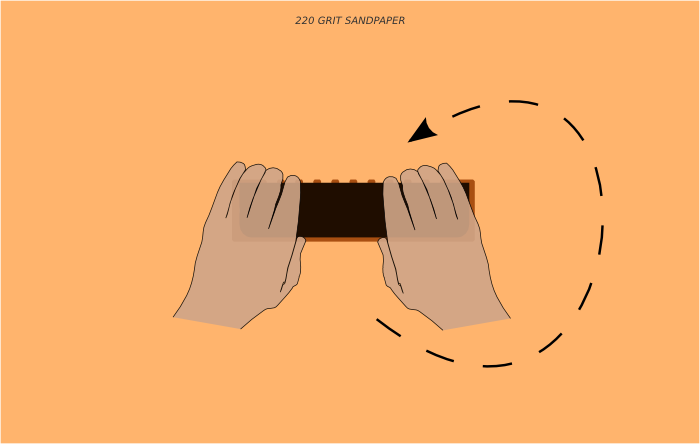
Move the comb around in circles in both directions until it feels smooth. This usually takes a few seconds. Flip it over and do the other side.
Place the reference along the surface of the comb and hold it up to the light. Hold it only on one side so that you can see how the other side behaves.
Switch sides. this gives us a good clue as to where the comb is bowed and where to flatten.
Put the comb down on the flat sandpaper and apply finger pressure where you want to flatten. Drag the comb along the sandpaper. Check flatness and repeat until it's flat.
Rotate the comb so that you are checking the tips. One tine is leaky here. Flatten the other tines to fix this.
Check in between each tine.
Switch your grip from side to side to reveal where the curve is.
Apply finger pressure and drag the comb to fix.
This is flat.
You can use the tool to apply even pressure to a portion of the comb - just like you used your finger. If the comb was unflat in this area, I would apply pressure like this:
Use this technique on both sides to fix a curve that is concave downward.
In summary, the hard part is measuring flatness. Once you can tell where the comb is not flat, it's easy to fix.
Extra tips!
Here are some extra tips on using my comb tool:
This is part of a series about tuning the diatonic harmonica
Part 1 - Tune a harmonica using your ears and a simple chromatic tuner
Part 2 - More Better - ultra precision tuning
Part 3 - Perfect Pitch: Using breath dynamics for tuning
___________________
The diatonic harmonica can be tuned to different temperaments.
Equal temperament is when each note is tuned to its exact pitch. When the notes of a chord are played together at ET, the chords can sound dissonant because the harmonics aren't in sync. Just intonation means some of the pitches are tuned a little sharp or a little flat so that when played together, the chords sound very smooth. The harmonics are in sync.
Here is a diagram of the waveforms of the tonic and third superimposed:
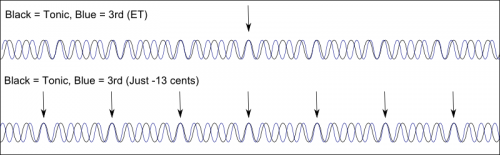
On the top, you can see that at ET, only one cycle is in sync. On the bottom at JI, every fourth cycle is in sync. That note needs to be 13 cents flat to sync up.
Here is a diagram of the the waveforms of the tonic and the fifth superimposed:
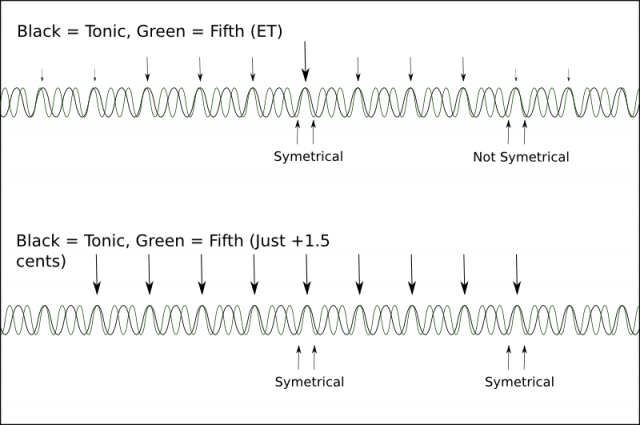
On the top line, at ET, only one cycle is perfectly in sync and we can see it rapidly go out of sync as you move away from the center. On the bottom line, every third cycle is in perfect sync. The interval of the fifth is a powerful sound (guitar players call it a power chord!) because the waveforms are in such harmony. But it only took 1.5 cents to disrupt the timing and make it sound less powerful.
There is no way you can tune a diatonic harmonica to within 1.5 cents accuracy by looking at the needle on a chromatic tuner.
Why?
Harmonica reeds don't always vibrate at the right pitch. If you apply too much air flow, the reed will vibrate too slowly and the pitch will go down. The note will sound flat. That's because you are making the reed move a lot further that it is designed to do (greater amplitude) and it has to travel a greater distance with every vibration.
Likewise, if you play the reed with much lower breath than intended, it will hardly move. Since it will only travel a short distance, it will make the trip is less time and the frequency will go up - the note will sound sharp.
Fortunately, there is a very large "sweet spot" where the reed responds to a range of air flow and can stay reasonably on pitch - within a few cents - even if you don't always use the same breath force to play that note. That's why we can play the diatonic harmonica with such a large range of dynamics.
The fact that the pitch varies by a few cents with breath force is both a curse and a blessing when it comes to tuning.
It's a curse because you can't just tune each hole to a specific note. You need to offset the tuning of each reed so that you meet the following criteria (to name a few):
- the single notes are on pitch
- octaves are on pitch
- the other intervals (fifths, thirds) are on pitch
- the three blow and two draw are enharmonic equivalent (the same note) but they are not the same note (blow three is a fifth, draw two is the tonic; each one has a different offset.)
To meet all these criteria you need high precision. That's where using dynamics actually comes in handy.
Longer reeds flatten more than shorter reeds as you increase air flow. When you play two reeds at the same time you can count on the lower reed to flatten more that the top reed as you increase air flow (because it's longer).
So if two reeds are very close to being in tune, say, they both register the same on the chromatic tuner but you hear beats when you play them together, you can tell which one is tuned higher by playing with increased breath force and listening to what happens.
- If the beating slows down or disappears when you increase air flow, the bottom note is a little sharp.
- If the beating gets worse with increased flow, the top note is a little sharp.
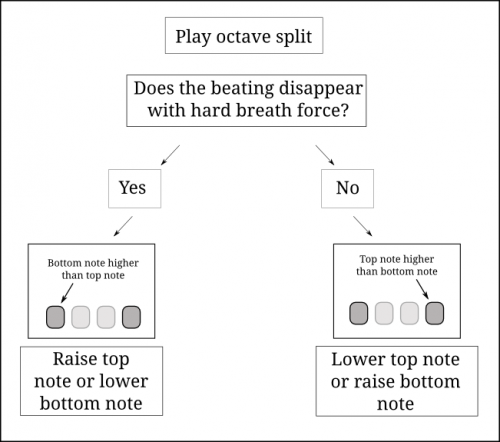
Here's another way of looking at it. This is an animated GIF of two waveforms superimposed. The waveforms are an octave apart. Both waveforms lengthen (drop in pitch) as breath force increases. The lower note in the octave is sharp but with increased breath force it goes into tune with the higher note for a short moment.
In this case, we should either tune the lower note a little sharper or flatten the higher note.
The effect of flow rate on pitch

Here's an example of using breath dynamics to tune with precision:
Warning: This blog post contains physics.
Here is an excellent demonstration of what happens when we bend notes. See what happens at the 3:00 minute mark.
When he finds the volume of the tube that is resonant to the frequency of the tuning fork, the sound increases. The frequency of the tuning fork stays constant though. Harmonica reeds are special because they can vibrate at different frequencies. We can make them vibrate faster or slower.
We apply “bending energy” by changing the size of the oral cavity just like professor Sumner Miller changed the size of the resonance chamber (cardboard tubes). Resonance is what applies kinetic energy to the reeds to make them vibrate at the desired frequency. If you want the reeds to vibrate slower, you open up your oral cavity to lower the resonance frequency. The reeds follow. It’s as simple as that.
Hopefully an understanding of what happens as you play a bent note can help you learn how to execute the technique.
Knowing the physics behind it allows you to free yourself from overthinking things. Don’t worry too much about tongue position, “U”-shape, “W”-shape, “G”-spot.... Just make an air pocket in your mouth and when you find the right size, the note will bend. Figure out what works for you to be able to re-create an air pocket of exactly the correct size every time you want to play that note.
It’s a little bit of a moving target when you consider that as you inhale, the tissues of your oral cavity will suck in and the air pocket will shrink. Conversely, the air pocket will grow when you blow bend because of the positive pressure. But with a little practice, your mouth will figure out how to keep the size of the air pocket constant despite these opposing forces.
Your ears play a big role in this. But the interaction between your voice, your ears and the shape of your oral cavity is automatic (or “autonomic”) so no instructions are required - other than to mention to make sure you can hear yourself play!
Overbends are just like regular bends!
Overbends are a little more complicated because we need both reeds (blow and draw) in the system to respond to the same resonance in different ways. One reed needs to stop moving while the other one needs to vibrate at the correct pitch. The trick is to get the reed that is standing still to stay still even though we are applying airflow to the system.
Sometimes out-of-the-box harps are set up to allow this to happen. Sometimes, they are set up to inhibit this. It’s the luck of the draw. It’s a common misconception than you need to practice overbends for years before you can become good enough to play them. The truth is that overbends require breath control, resonance control and a harp that is set up to cooperate.
It’s likely that you can learn to use overbends musically in a matter of weeks with the proper harp and some dedicated practice. You don’t need to build muscle over several years like a bodybuilder. You simply need to learn fine motor control.
I really enjoy watching professor Sumner Miller. Here is another video from the good professor where he describes the phenomenon of beating. Again, watch starting at the 3:00 minute mark:
Hearing the beating is a very important part of how to tune a harmonica.
This is part of a series about tuning the diatonic harmonica
Part 1 - Tune a harmonica using your ears and a simple chromatic tuner
Part 2 - More Better - ultra precision tuning
Part 3 - Perfect Pitch: Using breath dynamics for tuning
___________________
Can you have too much of a good thing? Probably.
Can a harp be in absolute perfect tune? Maybe. If you don't care all that much about harmonica tuning (as long as your harp doesn't sound too bad), you can stop reading this and go back to playing some mean harp or practicing scales.
You can find a straightforward method of tuning a diatonic harmonica here: Tune a harmonica using your ears and a simple chromatic tuner. That will get your harp sounding very nicely.
If you obsess about tuning and are willing to spend a considerable amount of time and effort to get it perfect, read on!
In summary, we will apply the same strategy we've used to get the octaves in tune to the fifths and thirds.
Here's an important fact: You need to tune every Fifth with as much accuracy as you can.
What's so special about the fifths?
Every note of the scale has a purpose. For example, the Thirds and the Sevenths give the scale it's general sense of being (major, minor, dominant...). Fifths imply the Tonic; they are closely related to the tonic. It's important to get the tuning of the fifth (and fourth - same thing) right to make the chord sound nice.
Since the tonic and fifth are so closely related, the margin of error is considerably tight. A very small adjustment can go a long way. Often a fifths is tuned to less than 2 cents from ET, so even if you like your harps tuned to ET, you should be able to get away with such a small offset - you get the best of both worlds.
No chromatic tuner will be of help - you need to use your ears for adjustments this precise.
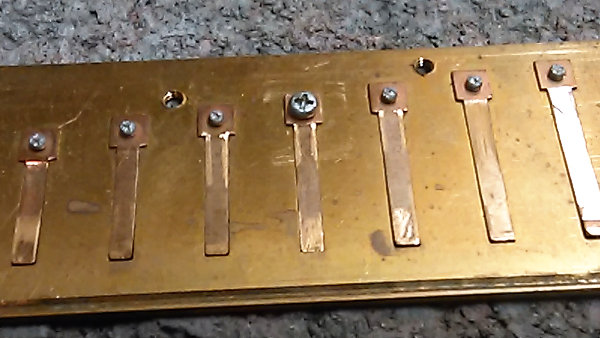
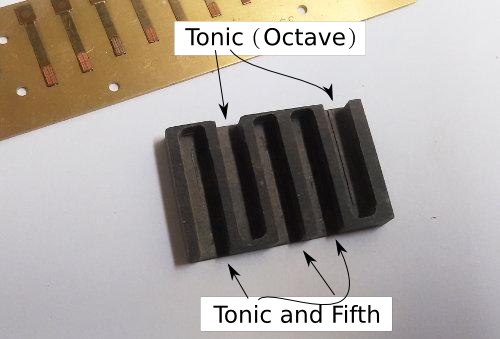
There are a lot of fifths on the standard diatonic harp. Every arrow in this picture is an interval of a fifth. If you enjoy tuning, dig in!
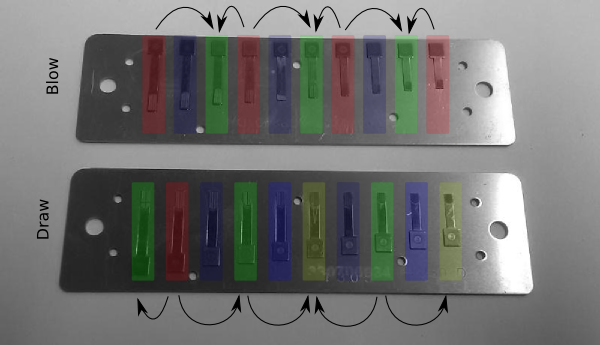
I can't tongue-block these intervals without affecting my embouchure which will cause some bending of these notes. That's not helpful to precise tuning! To play these intervals with a natural embouchure, you can isolate these pairs of reeds with the cover plates off using one finger to mute the thirds.
There are two chords on the draw plate so there are two different Fifths! The 2 draw is the tonic of the 1-2-3-4-5 draw chord. But the 4 draw is the tonic to the 4-5-6 minor chord. So 2-4 draw is an interval of a fifth, but so is 4-6 draw. These notes are repeated up the harp so 6-8 is a fifth, too.
Waitaminute! 6-8 is a fourth! Yes, but 8-6 is a fifth!. Take a minute to think about that...
...
And 8-10 is a fifth.
So tune the fifths with your tuner and then fine tune them with your ears. Play the tonic and the fifth and eliminate beating in the same way you eliminate beating when you tune octaves (using variable breath force to figure out which way to adjust the notes. See here: Tune a harmonica using your ears and a simple chromatic tuner. These beats are a little harder to hear than straight octaves, but they are there.
Thirds anyone?
Now that you have tuned all the fifths to perfection, can you use the same process with the thirds? Sure. Play the tonic and third together and fine-tune it to eliminate beats.
On the draw plate, there are two chords so there are two thirds. The 3 and 7 draw are major thirds to the 2 draw. The 5 and 9 draw are minor thirds to the 4 and 8 draw. Since major thirds need to be tuned about 12 cents flat to be just, you can compromise and find a nice sounding spot in between equal (0) and just (-12). Minor thirds are just at +16 but they sound pretty good near zero.
Remember the 5 draw is also the flat seventh of the 2 draw as well as the minor third of the 4 draw. What sounds good for one may not sound so good for the other. You decide what's best...
This is an extended French TunerTuner™. They are not part of my tool kit but are available separately.
What does it do? It helps tune the Fifths, Thirds as well as the Octaves on the blow plate.
The extended French Tuner works just like the regular FT. It plays octaves on one side and plays the other intervals on the other side.
Octaves:
Fifths:
You don't need any fancy equipment to tune properly. Even the French tuner/extended FT is just a tool to speed up the process. Use your ears. I'm posting these images to offer you a further visual example of what reeds to tune as pairs.
Some points to remember about tuning intervals relative to the tonic:
- If you play both the Tonic and the Fifth, a chromatic tuner will indicate the tonic - even if the tonic is the higher note (example, 3-4 blow or 6-8 draw.)
- Use your ears just like when tuning perfect octaves.
- If you hear beating that disappears when you increase your breath force, the bottom reed is tuned higher than the top reed (again, even if the bottom reed is the fifth)
Happy tuning!
***Please note I am no longer offering this tool. I have a new tool set which takes its place. Please see The Flatness Tool™ and Reed Plate Claws™***
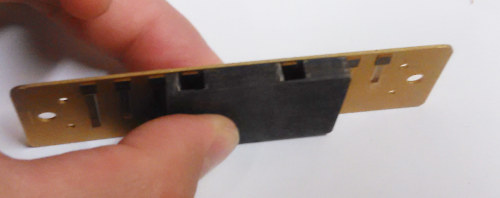
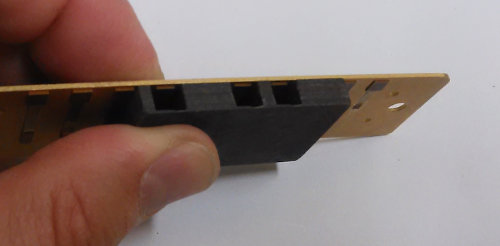
The F tool™ can find and correct air leaks caused by a reed plate that is not perfectly flat.
Use it on Both the blow plate and the draw plate.
Rockin Ron told me that he gets quite a few technical support questions about replacement reed plates. The harmonica looks like a simple instrument but once you have taken it apart for the first time, you realize how important all the little details can be!
Here's a video about the basics of installing new reed plates into your favorite harp:
The F Tool™ is now available in the Tools section
A well-playing harp has a solid connection to the vocal tract. A big part of what makes it is easy to play, sound nice and fat is that it's airtight.
If it leaks air, the connection between your vocal tract and the instrument is weakened and the harp feels stiff. The tone is also weaker.
The good news is air leaks are fixable! In fact, that's the fundamental step in improving a harmonica. If you skip this step, you will usually end up working against yourself further down the line.
The detailed instuctions on How to use the F Tool are here.
Copyright © 2026 Andrew Zajac - All rights reserved